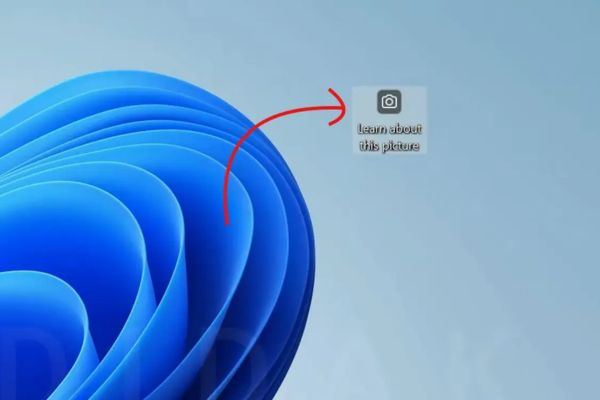
Windows 11 introduces a modern and visually pleasing interface with many unique features—one of them being Spotlight, which automatically rotates stunning wallpapers from around the world. However, not everyone appreciates the “Learn more about this picture” icon that appears on the desktop. So, how can you effectively remove this icon? Let’s explore the detailed solutions below!
Why Is the “Learn more about this picture” Icon Annoying?
The Spotlight feature in Windows 11 not only provides beautiful backgrounds but also allows users to click the “Learn more about this picture” icon to get information about the image. While this concept may be interesting to some, many users find it distracting. According to reports from Windows Latest, users complain that the icon clutters the desktop—especially for those who simply want to enjoy the wallpaper without any additional info.
One post on the Microsoft Feedback Hub addressing this issue has received over 400,000 views, showing that the desire to remove this icon is not just a personal preference but a widespread concern. Unfortunately, Microsoft hasn’t yet included a built-in option to disable the icon, forcing users to rely on manual solutions.
Easiest Way: Turn Off Spotlight Entirely
If you’re not a fan of Spotlight at all, the easiest way to remove the icon is to disable the feature entirely and switch to a static background from your personal collection.
To do this:
- Go to Settings > Personalization > Background
- Choose “Picture” or “Slideshow” instead of “Windows Spotlight”
However, the downside of this method is that you’ll lose the convenience of automatically changing wallpapers.
Method 1: Use Registry Editor to Remove the Icon
If you want to keep Spotlight but eliminate the annoying icon, here’s a more technical but highly effective solution using the Windows Registry Editor. Follow these steps carefully:
- Press Windows + R, type
regedit, and press Enter. - Navigate to the following path:
HKEY_CURRENT_USER\Software\Microsoft\Windows\CurrentVersion\Explorer\HideDesktopIcons\NewStartPanel
- Right-click in the blank space on the right, select New > DWORD (32-bit) Value.
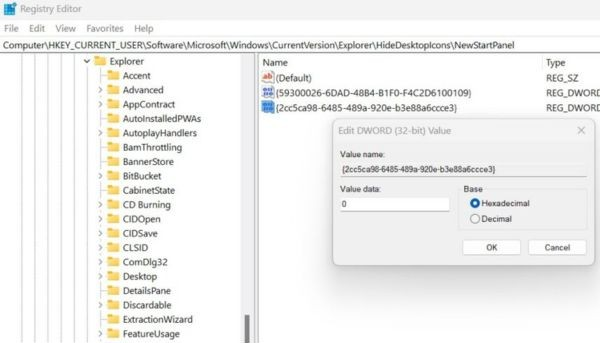
- Name the new key:
2cc5ca98-6485-489a-920e-b3e88a6ccce3
- Double-click the newly created key, leave it as Hexadecimal, and set the Value Data to
1, then click OK. - Close the Registry Editor and restart your computer.
After restarting, the “Learn more about this picture” icon should be completely gone. To restore it later, just return to the same key and change the Value Data back to 0.
Method 2: Use Explorer Patcher to Hide the Icon
If editing the Registry seems risky or unfamiliar, a more user-friendly solution is to use a third-party app like Explorer Patcher. This open-source tool is easy to use and safe. Here’s how:
- Go to the Explorer Patcher GitHub page to download the latest version.
- Run the installer and wait for the setup to complete. The tool will launch automatically.
- Navigate to the Spotlight tab in the left-hand menu.
- Check the option “Hide the ‘Learn more about this picture’ icon.”
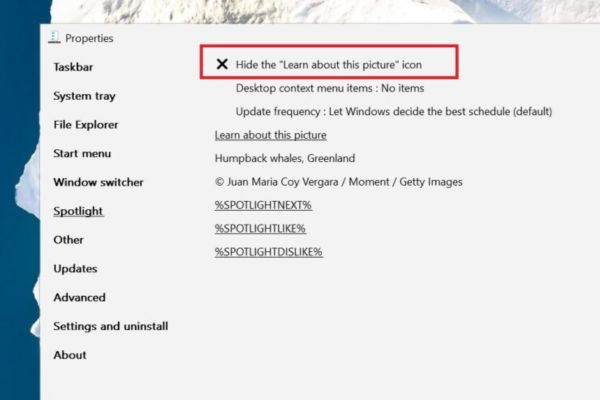
The icon will disappear immediately—no restart required. If you ever want to bring it back, just uncheck the same option.
Final Thoughts
With hundreds of thousands of user complaints, there’s a good chance Microsoft will eventually include an official toggle to remove the “Learn more about this picture” icon in a future Windows 11 update. Until then, these methods will help you achieve a cleaner, more minimal desktop experience tailored to your preferences.
👉 For a quick visual guide, check out the step-by-step GIF tutorial on my page here — it makes the process even easier to follow!
You also may interested in
How to Easily Create Memes Online in Just a Few Steps
RunCat: The Cutest Mac Performance Monitor You’ll Ever Use
“The Official iOS 26 Interface (Liquid Glass) — So Fluid, So visionOS.”