Discover how to install GPT-OSS on Windows 11 to run AI offline, helping you experience the latest free models from OpenAI right at home.
Table of Contents
- What is GPT-OSS?
- What’s cool about GPT-OSS?
- What do you need to prepare for installation?
- Step-by-step guide to install GPT-OSS on Windows 11
- Method 1: Install GPT-OSS via Ollama interface
- Method 2: Install GPT-OSS using command line
- Important notes when using
- Conclusion
How to install GPT-OSS on Windows 11 is currently a super hot topic. This is especially true for those who love tinkering with technology. The good news? OpenAI just launched two new AI models. You can use them right on your computer without internet. And they’re completely free. This article will guide you step-by-step in the easiest way possible to bring this “AI assistant” home.
What is GPT-OSS?
OpenAI just shook up the AI world. They released two new open-source “warriors” named gpt-oss-120b and gpt-oss-20b. This decision is seen as a strategic move. It responds to competitive pressure from rivals, especially Chinese companies. These companies are very strong in releasing low-cost AI models.
These models are “open-weight” type. The community can freely download, use, customize, and redistribute without cost. The gpt-oss-20b version can run smoothly on a regular laptop. It only needs 16GB RAM. This turns the dream of owning a powerful, private AI assistant into reality.
What’s Cool About GPT-OSS?
These two models are not only free and run offline. They also possess impressive technologies. This demonstrates OpenAI’s commitment to bringing AI to serve humanity’s benefit.
- They’re equipped with “chain-of-thought reasoning” technology, allowing AI to perform multiple logical thinking steps before giving answers, helping increase accuracy and depth of responses.
- They have the ability to operate as a smart AI agent, capable of executing code, browsing the web for information, and even calling other cloud models to support complex tasks.
- Their performance is extremely impressive, especially the gpt-oss-120b version is rated as having power equivalent to proprietary models like o3-mini and o4-mini from OpenAI itself.
- They’re released with the open-source 4o Tokenizer toolkit, a top-tier text processing tool that helps OpenAI’s AI models have low operating costs. Especially, this tool helps GPT understand Vietnamese as naturally as English without needing additional training.
What Do You Need to Prepare to Install GPT-OSS?
For the install GPT-OSS process to go smoothly, you need a support tool called Ollama. This is an excellent open-source application that acts as a bridge helping you easily download and run large language models (LLM) right on your personal computer.
Regarding configuration, you need to note:
For gpt-oss-20b model: A computer with minimum 16GB RAM is enough for the experience.
For gpt-oss-120b model: This is the larger and more powerful version, requiring very high hardware configuration like dedicated GPU (for example, NVIDIA with 80GB VRAM), RAM from 256GB and up. Therefore, the 20b version is the most suitable choice for regular users.
Step-by-Step Guide to Install GPT-OSS on Windows 11
You can choose one of two following methods: using graphical interface (GUI) or command line (CLI). Both are very simple.
Method 1: Install GPT-OSS via Ollama Interface
Step 1: Open Start, type Terminal or Command Prompt, then right-click and select Run as administrator.
Step 2: Copy and paste this command line and press Enter:
winget install --id Ollama.Ollama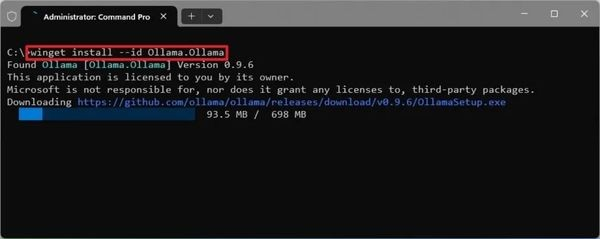
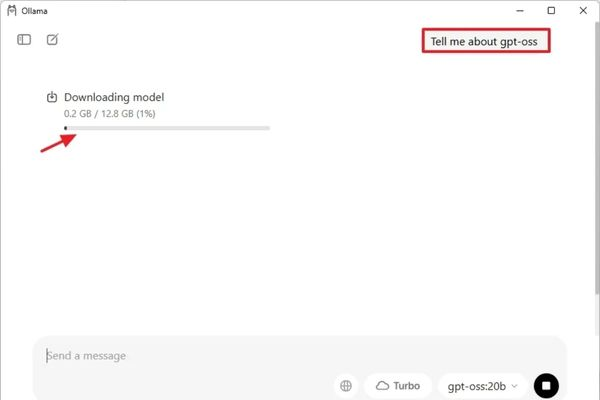
Step 3: After installation is complete, open the Ollama application from Start menu > Select GPT-OSS:20b model.

The first time, Ollama will automatically download this model to your machine. You just need to wait a bit and you’re done. From now on, you can chat with AI anytime.
Method 2: Install GPT-OSS Using Command Line
Step 1: Install GPT-OSS Ollama exactly like the method above.
Step 2: Open Command Prompt or Terminal with administrator rights.
To download the small version, type the following command and press Enter:
ollama pull gpt-oss:20bIf you have a super powerful machine and want to try the larger version, use command:
ollama pull gpt-oss:120b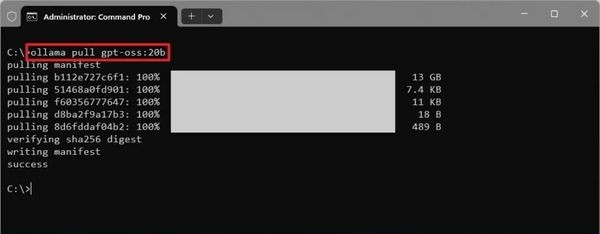
Step 3: After the download process is complete, type the following command to start a chat session:
ollama run gpt-oss:20bFrom here, you can enter any question and AI will respond directly in the command line window.
Important Notes When Using After You Install GPT-OSS
Performance depends on hardware: If your computer doesn’t have a graphics card (GPU) or dedicated neural processing unit (NPU), AI response time might be a bit slow.
Absolute security and privacy: Since the model runs completely on your machine, all data and conversations are secure, not sent to any server.
Freedom to customize: The models are released under Apache 2.0 license, allowing you to freely use for commercial purposes, fine-tuning, and redistribution.
Conclusion
That’s it! Now you know how to install GPT-OSS on Windows 11. This is an excellent opportunity to experience advanced AI technology safely and completely free. Try it now and see what this personal AI assistant can help with your work and life!
Ready to install GPT-OSS and revolutionize your AI experience? Visit gif.how for more cutting-edge tech guides, step-by-step tutorials, and the latest developments in offline AI technology. Because why pay monthly subscriptions when you can have your own AI assistant running locally on your Windows 11 machine?