In this guide, you’ll learn exactly how to create a fillable form in Word, with practical, step-by-step instructions and helpful tips to ensure your form is ready for others to complete.
Introduction
If you’re wondering how to create a fillable form in word, you’ve come to the right place. This article walks you through creating a professional, interactive form using Microsoft Word’s built-in Developer tools, so respondents can type answers directly into fields, check boxes, and select options. Whether you’re building a survey, registration form, or feedback sheet, these steps apply to recent versions of Word, including Word for Microsoft 365. The short video below will help you create a fillable form in word in under 1 minute
or you can see the step by step guide below
Step-by-step guide to create a fillable form
1. Show the Developer tab
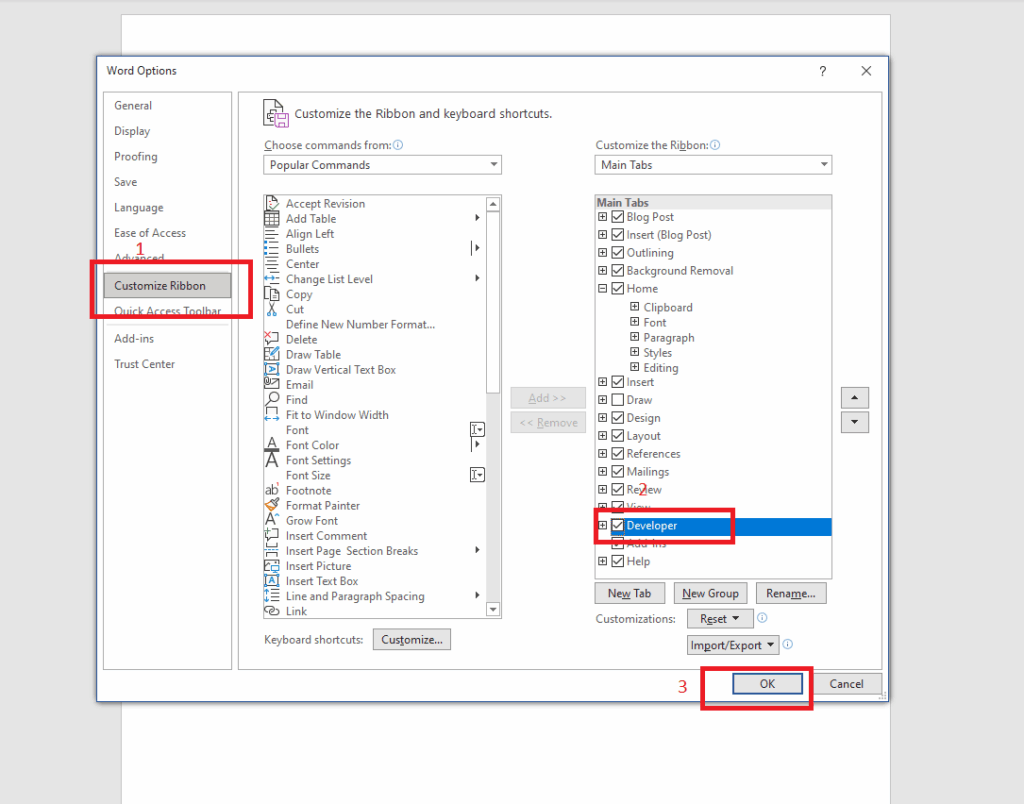
- Open Word and go to File > Options.
- Choose Customize Ribbon.
- In the right column, check the box labeled Developer.
- Click OK. The Developer tab now appears on the ribbon.
2. Create the structure of your form
- Type the questions or prompts where you want fillable fields to appear.
- Use regular text for labels and headings to guide respondents.
3. Insert fillable controls
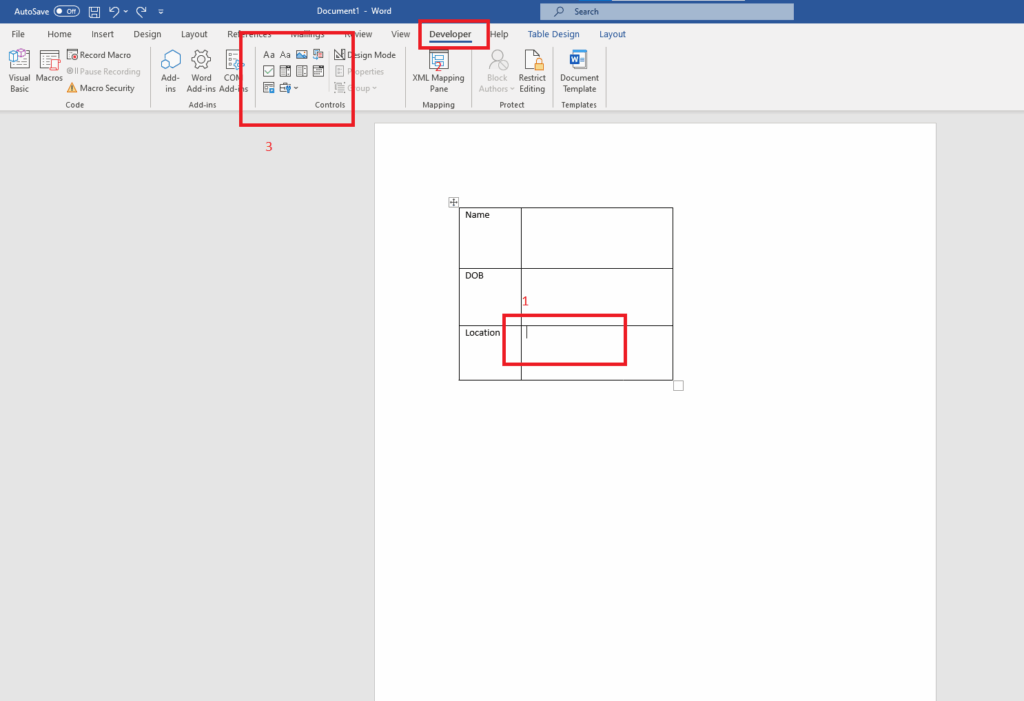
The core of a fillable form is the set of controls you insert from the Developer tab.
- Place your cursor where you want a field.
- Click the appropriate control:
- Rich Text Content Control: allows formatting within the answer (useful for longer responses).
- Plain Text Content Control: simple text field for short answers.
- Date Picker: lets users choose a date from a calendar.
- Check Box: for yes/no or true/false responses.
- Drop-Down List: provide a list of predefined options.
- Combo Box: allows typing or choosing from a list.
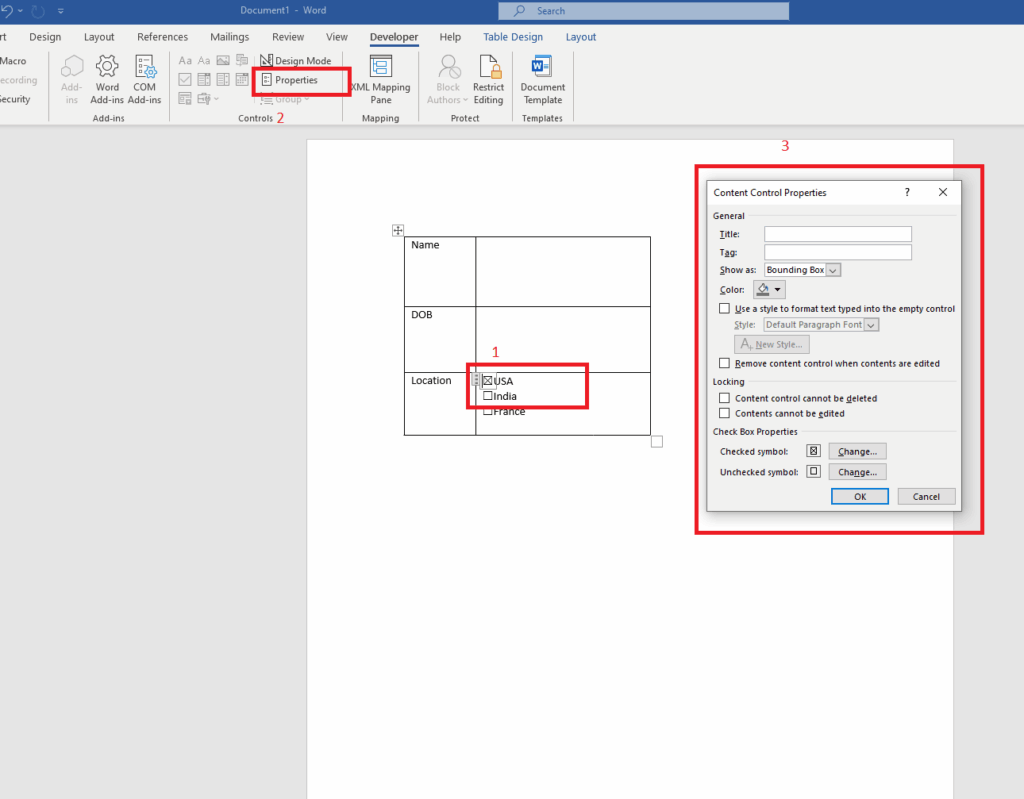
- After inserting a control, you can customize it:
- Select the control and choose Properties on the Developer tab to set a title, tag, or default text.
- For Drop-Down or Combo Box, add items in the Properties dialog.
4. Label and organize fields
- Add clear labels to each field so respondents know what to enter.
- Use tables or tabs to align fields neatly if you want a professional layout.
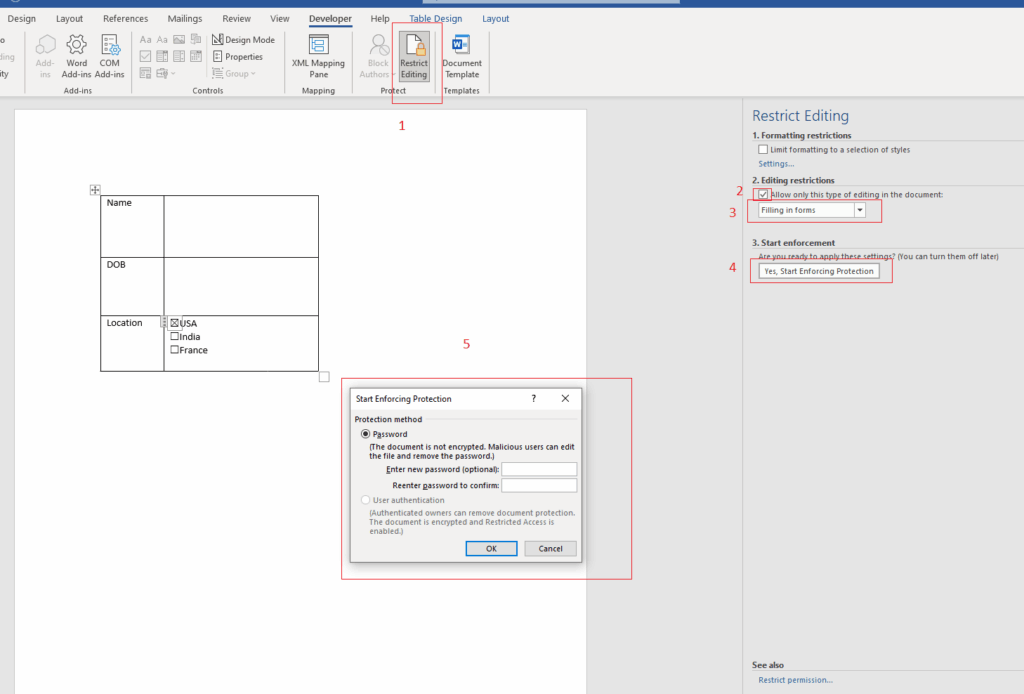
5. Restrict editing to fillable fields (optional but recommended)
- Go to Developer > Restrict Editing.
- Under Editing restrictions, check “Allow only this type of editing in the document” and choose “Filling in forms.”
- Click Yes, Start Enforcing Protection. You can set a password if desired.
6. Test your form
- Save the document as a Word template (.dotx) or a regular Word document (.docx).
- Close the document and reopen it, or simply switch to Print Preview to see how the fillable fields behave.
- Type in the fields to ensure they accept input and the controls behave as intended.
7. Save and distribute
- Save your final version.
- If you plan to share via email, you can also export to PDF, but note that not all PDF readers preserve Word’s fillable fields unless you create a PDF form with Word’s export options.
Troubleshooting and tips
Common issues and fixes
- Fillable fields won’t accept text: Ensure the field is a content control (Plain or Rich Text Content Control). If you used normal text, convert that area into a content control.
- Locking prevents editing: Check Restrict Editing settings and ensure the document is in “Filling in forms” mode, not “No changes (Read only).”
- Drop-Down or Combo Box items don’t appear: Reopen the Properties for that control and add the items, then save.
- Fields don’t align: Use a table or consistent spacing. Tables help keep a clean, grid-like alignment.
Accessibility considerations
- Use descriptive titles and tags for each control so assistive technologies can identify them.
- Ensure sufficient contrast between labels and the form’s background.
- Keep the form’s layout simple and logical for screen readers.
Safety precautions
- If you share the form widely, consider password-protecting the editing mode to prevent unintended changes to the form’s structure.
- Always review any shared templates for sensitive information before distribution.
Advanced techniques (optional)
Using legacy form fields
Word supports legacy form fields via Developer > Legacy Tools. They’re useful when collaborating with older documents or requiring compatibility with older Word versions. However, modern content controls are generally easier to use and more flexible.
Adding tab order navigation
To improve usability, ensure a logical tab order by placing controls in the sequence users will fill them. Word follows the order you place controls, so plan the layout accordingly.
Conditional formatting for forms
Word’s native capabilities are limited for advanced forms. If you need complex rules (e.g., showing/hiding fields based on answers), you might consider converting to a more robust form tool or embedding macro-enabled features. For most typical forms, standard content controls suffice.
Practical examples you can try
- A job application form: Include fields for name, contact details, date available, resume upload note, and consent checkboxes.
- A conference registration form: Capture attendee name, email, session selections via a drop-down, dietary restrictions, and payment status.
- A feedback form: Use multi-line Rich Text fields for comments, a rating via checkboxes or a 1–5 scale, and a recommendation question.
Quick reference checklist
- Enable the Developer tab.
- Insert appropriate content controls for text, dates, and selections.
- Add clear labels and organize layout.
- Optional: restrict editing to fillable form fields.
- Test thoroughly and save in a shareable format.
Conclusion
How to create a fillable form in Word combines simple structure, the right controls, and careful testing to produce interactive documents anyone can complete. By enabling the Developer tab, inserting content controls, labeling clearly, and optionally restricting editing, you can craft professional forms suitable for surveys, registrations, and feedback. With these steps, you’ll have a polished fillable form ready for distribution in Word, compatible with most modern Office environments and easy for users to complete accurately.
So go ahead, experiment with these techniques on your next project. Your videos will thank you for it. If you found this helpful, be sure to check out our other short, easy-to-follow video tutorials at Gif.how!
